Makin’ Whoopee…Salted Peanut Whoopie Pies…
I have not been this excited about mastering a recipe in years! Reading the news paper and Delicious magazines predictions on what’s ”hot” this year in the line of culinary arts, I could not stop myself from flying into the kitchen to bake up an enormous storm as whoopie pies are going to be in vogue this year.
We had a lot of fun making these outrageously indulgent and seriously delicious whoopie pies. At first the song “Makin’ Whoopee” by Frank Sinatra got us going, singing in the very non musical voices that we have. It bugged us for a while at first as we knew there was a song with these words, well I hope you get the idea and feeling of the amount of fun we had creating this incredibly yummy cake.
I was reading up about whoopie pies and it’s said that they apparently originated in Maine, USA amongst the Amish community. The Amish wives used to bake small cakes from their leftover cake batters, sandwiched them together with butter cream and packed them into the lunch boxes of their children and husbands. The name is claimed to have originated from when the husbands and children opened their lunch boxes and found these delights they would scream “whoopie”. Well even if this is untrue and only a myth I want it to be true. Making whoopie entertained us for a few hours and made me laugh from deep inside, smile and shout yippee. I had smeared chocolate around my face and there was something magical and romantic about these pies . I know that the song and the cake are not linked in any way shape or form but it helped me to create this desirable recipe.
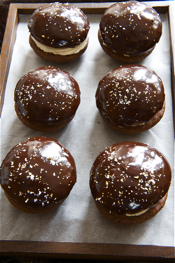
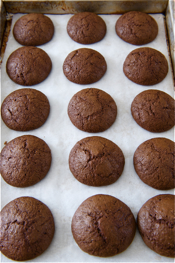
It was a bit of a finger in the air after reading endless versions of American whoopie pie recipes on the net. Discovering that they should be chocolate flavoured but then the only recipes that made any sense were pumpkin flavoured which confused me even more. So I approached the “whoopie project” by ripping up all the 8 sheets of nonsensical scribbles and developed my own recipe. The results were outrageously good and I screamed “whoopie” when they came out this good!
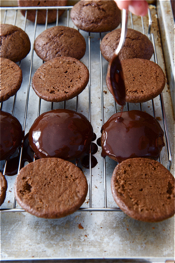
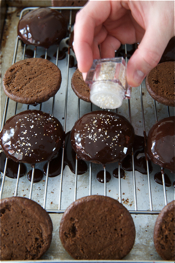
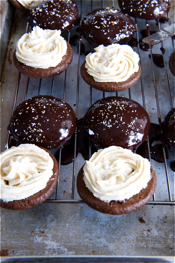
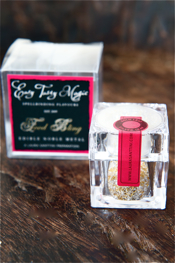
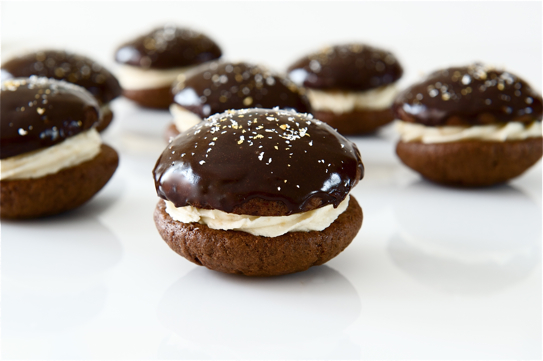
I garnished my whoopie pies with a glossy chocolate glaze and sprinkled them with my Christmas pressie to give them an extra touch of glamour and class. Mr.P gave me a jar of Laura Santtini’s Food Bling for Christmas so when the opportunity arose to use it, this girl was in heaven. The traditional butter cream filling was replaced with a salted peanut cream cheese filling…ooh it’s incredibly good and adds a crunch and salty sweet naughtiness to this heavenly cake.
They say the cupcake is 2009 so watch out for whoopie pie!
I’m going to make a outragious statement: I think whoopie pies are much better than cupcakes! Reason for this statement is that you have cake on both sides of the frosting and there is the addition of a extra space for more garnish and gloss. This prevents the possibility of a dry portion of cake as per cupcakes. As cupcakes only have a frosting on top you get to eat the best bits first and can be left with dry cake in the base of the cupcake paper. Well with the whoopie pie you get to eat it all together and makes the best bits last for longer. Get my point?!?!
Salted Peanut Frosting
- 200g cream cheese, Philadelphia cheese is the best one for this recipe (full fat natural flavour)
- 500g icing sugar
- 50g melted butter, cooled
- 100g salted roasted peanuts, crushed
Make this cream cheese frosting in advance, it needs to set otherwise your whoopies will have a runny filling. I normally make the cream cheese frosting the evening before I need it, as it just simply speed things up. Alternatively if you make it on the day when you need it make sure you leave the frosting in the fridge to set before using.
Melt the butter and set aside to cool, it does not matter if it starts to set as long as it's still soft and pliable. I always melt a bit extra as you will find that it sticks to the bowl. Weigh the 50g required of melted butter after melting.
I also made this in my thermomix however you could have used any other make of blender.
First blitz the salted peanuts. Weigh the peanuts directly into the bowl and secure the lid and turn the dial on lock, press the pulse button until the peanuts are crushed and resemble breadcrumbs. Do not leave the peanuts to blend for too long as it will become a paste. Tip the crushed salted peanuts into a small bowl.
Place the icing sugar and cream cheese in the bowl and blend for 20 seconds, scrape the sides down and insert the butterfly whisk and whip the cheese for 2 minutes on speed 2.
Add the cooled, slightly set but still soft butter to the mixture, add the crushed peanuts and continue whipping with the butterfly whisk for a further 1 minute.
Transfer the frosting to a piping bag with a star nozzle (optional) and let the frosting cool in the fridge until set.
If you do not have a Thermomix then use any other branded machine with a balloon whisk attachment and follow the method as per above. Crush the peanuts using a pestle and mortar or any other machine with a blade to chop the nuts to the required texture.
Whoopie Pies Cake Recipe
- 280g plain flour
- 30g cocoa powder
- 1tsp baking powder
- 2tsp bicarbonate of soda
- 150g soft brown sugar
- 60ml sunflower or peanut oil
- 125ml Crème Fraîche or natural yoghurt
- 1 large free range egg
- 60ml boiling water
Preheat the oven to 200°C and line two large baking sheets with parchment paper.
Weigh the sugar into a large mixing bowl and loosen it up by letting it run through your fingers, like sand, break up any lumps.
Sift the flour, cocoa powder, bicarbonate of soda and baking powder over the sugar and mix it together.
In a separate bowl whisk the egg, crème fraîche and oil together. Add the boiling water whilst whisking and immediately stir the liquid into the sifted flour mixture. I have done this all by hand but you could use a mixer to do this. Do not over work the mixture, once it all comes together stop mixing.
Leave the cake batter to rest and cool down for 5 minutes. This stage is actually important as I baked the first tray and they came out all misshapen. Once I left the cake batter to cool a bit it was easier to work with and my whoopies came out more evenly and better shaped.
Transfer the cake batter to a piping bag (I tried shaping them with spoons but the piping bag gave me the best looking results). Pipe the cake batter in aproximatly 5 cm rounds, remember they will expand and spread so your whoopies will be slightly bigger than the size piped . Bake them in the preheated oven for 10 - 12 minutes, if they are a bit bigger than my size in this recipe I suggest you to bake them a tad longer. You are looking for a soft but cooked half moon cake, use a pallet knife to remove from the paper. If a crust has formed at the bottom it means they are cooked. Once the whoopies cool down they will have a bit of a crunch on the outside and the inside wil be caky and soft.
Transfer the cooked whoopies to a cooling rack to cool completely.
Makes approximately 24 - 28 half moon whoopies
Chocolate Glaze
- 80ml water
- 110g caster sugar
- 80ml double cream
- 40g cocoa powder
- 2 leaves of gelatine
I make this once the whoopies have gone into the oven, this glaze should have cooled down slightly but should still be runny and not completely set when you garnish the whoopies.
Soak the gelatine leaves in cold water until soft.
Weigh the caster sugar, water and cream into a small saucepan and bring it to the boil, boil the mixture for 2 minutes over high heat.
Add the cocoa powder and return the mixture to the heat and continue boiling for a further one minute over high heat.
Remove the saucepan from the heat and squeeze the gelatine to remove any excess water, stir the soaked gelatine into the warm cocoa mixture, mix well and transfer the mixture to a small bowl and set aside to cool till about 22°C - 24°C.
Once the glaze reaches this temperature it's easier to apply to the whoopies.
Pair up the whoopies so that you have two that are of similar size and place the one side of the pair on a cooling rack with the flat side down, spoon glaze over to cover the whoopie completely, sprinkle each whoopie with your desired garnish. This is optional, I have used edible gold and sliver leaf however edible glitter or silver balls and sugar sprinkles will be just as pretty.
Let the glazed over whoopie half moons set in the fridge. Remove them from the fridge as soon as the glaze is set.
Pipe the set salted peanut frosting on to the other half of the whoopie pair, then place the glazed other half on top and the whoopies are ready to be enjoyed.
Makes aproximalty 12 - 14 finished whoopie pies
Print Recipe Print Recipe with Photo Email this Recipe



my daughter has just discovered whoopies and we both think they’re delicious. your recipe sounds a good one to try.